[ad_1]
Getting and keeping the attention of your audience during a meeting is easier with visual flare like highlighting the mouse pointer. Windows 10 buries the feature deep in the Control Panel.
Image: Rawpixel.com/Shutterstock
For many of us operating in a modern work environment, having a team meeting often means we are using some form of remote online collaboration tool like Microsoft Teams or Zoom. When you are leading one of these online meetings, getting and holding everyone’s attention can be a challenge. Any visual aid you can bring to the table would be helpful.
SEE: 83 Excel tips every user should master (TechRepublic)
In Microsoft Windows 10, using a setting found deep in the Control Panel, you can add a simple pulsing highlighter visual cue to your standard mouse pointer. This small bit of flare can help you get and keep the attention of your audience during your next meeting or presentation. However, as you might expect, turning this mouse pointer highlighter feature on is not as simple as it should be.
This how-to tutorial shows you how to activate the pulsing mouse pointer highlighter feature in Windows 10.
SEE: Zoom 101: A guidebook for beginners and business pros (TechRepublic Premium)
How to add a highlighter to your mouse pointer in Windows 10
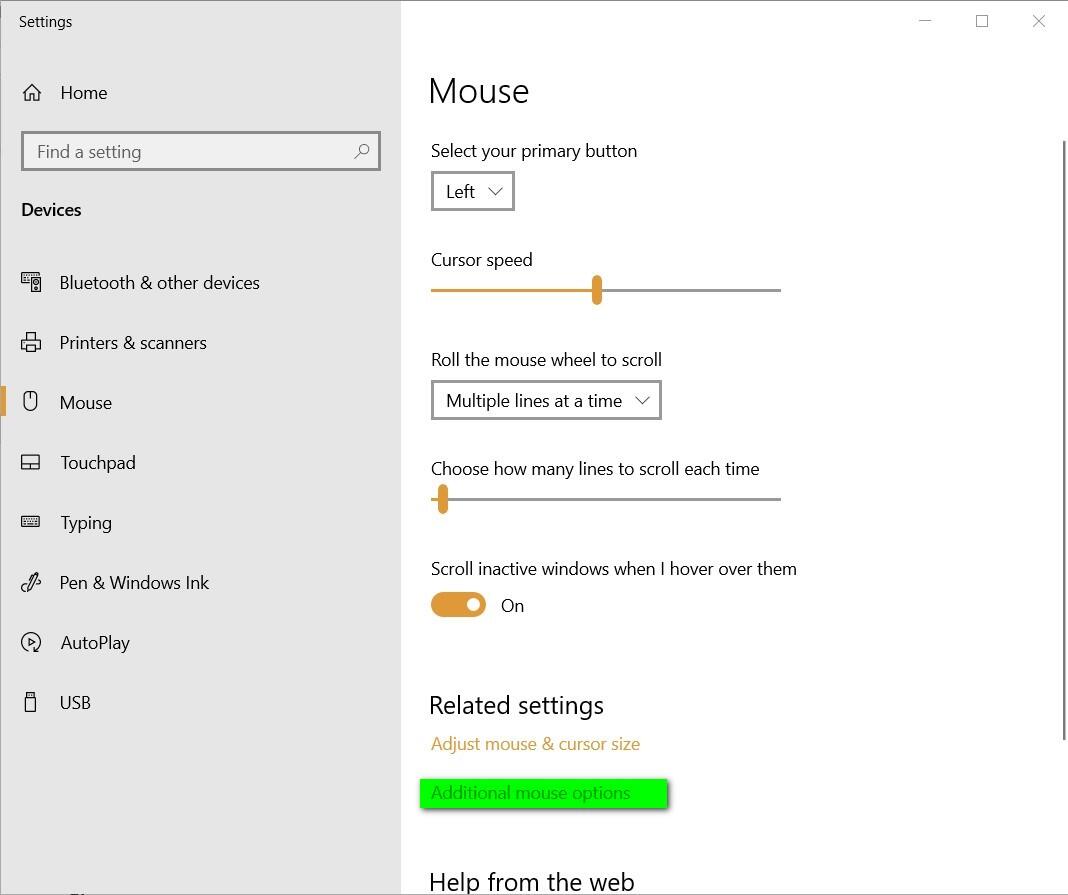
For reasons we can only speculate, typing “mouse options” or “mouse properties” or “mouse settings” in the Windows 10 desktop search box will not take us to where we need to go for this specific setting. Any one of those search terms will, however, take us to the general mouse settings screen shown in Figure A.
Figure A


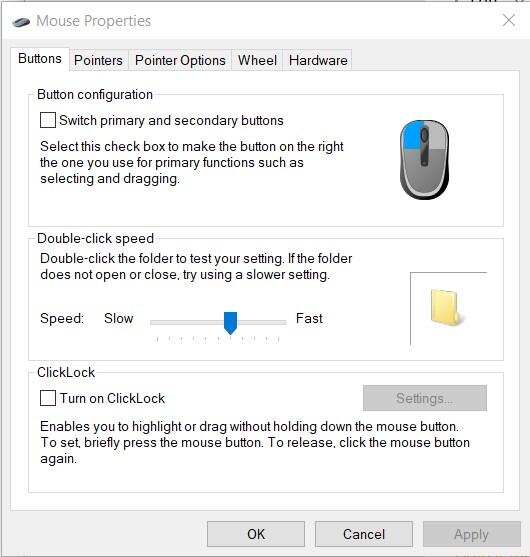
As you scroll down the mouse settings page, you are presented with two links to additional mouse settings. The first link takes you to a page where you can adjust the color and size of your cursor and mouse pointer. The second link, labeled Additional Mouse Options, is where we need to go, so click it to get to the Windows 10 Control Panel for mouse settings shown in Figure B.
Figure B


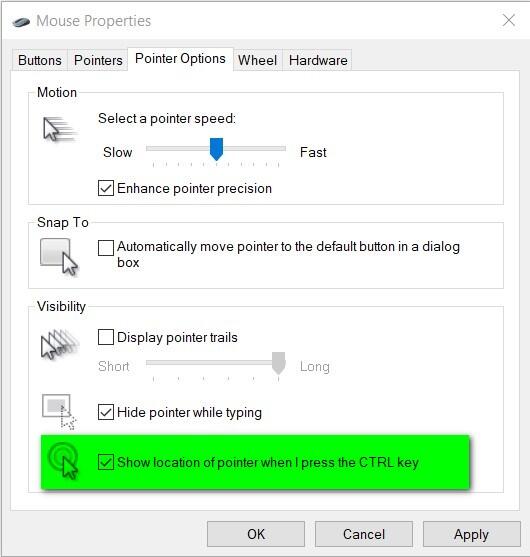
Click the Pointer Options tab to reveal the mouse setting screen shown in Figure C. Near the bottom of this screen you will see a checkbox labeled Show Location of Pointer When I Press the CTRL key. Check the box and click Apply.
Figure C


When you click Apply, you may see a new screen informing you that some Microsoft .NET runtime files are being installed, click Continue to finish that process.
Once the setting is applied, click the OK button to close the mouse settings window.
SEE: How to activate and use Color Picker in Windows 10 PowerToys (TechRepublic)
Now, when you place your mouse over a button or other item you would like to highlight for your meeting or presentation and then press and release the CTRL button on your keyboard, Windows 10 will highlight the position with a circular highlighting pulse.
To turn it off after your meeting or presentation is over, just follow this process again, uncheck the setting and click Apply.
How to get more intense cursor highlights
This simple pulsing mouse pointer highlighter, used in conjunction with a larger and more colorful mouse pointer, may be all you need to give your next meeting a little spark. However, if you want to have more options for your mouse pointer during meetings you will have to resort to either installing new cursor images into Windows 10, opt for third-party software or apply a combination of both methods.
Also see
[ad_2]
Source link
